6. If the status is 'Completed', the section is ready for authorisation by the CPI, CPI Delegate, PI or PI Delegate (refer to 'Project Member Role to Authorise / Unauthorise Project Details'). If a section of Project Details is not authorised an alert at the top of the page will be present.

7. If you are the relevant role, click 'Authorise'.
Complete the Project Header information
1. In the project's workspace, click on the 'Project Details' tab.

2. Select 'Project Header' in the index, and click 'Edit'.

3. Update the relevant fields.
All mandatory fields have a red asterisk (*) next to them.
Place your pointer over the tooltips to read more information about the section or field to be completed.
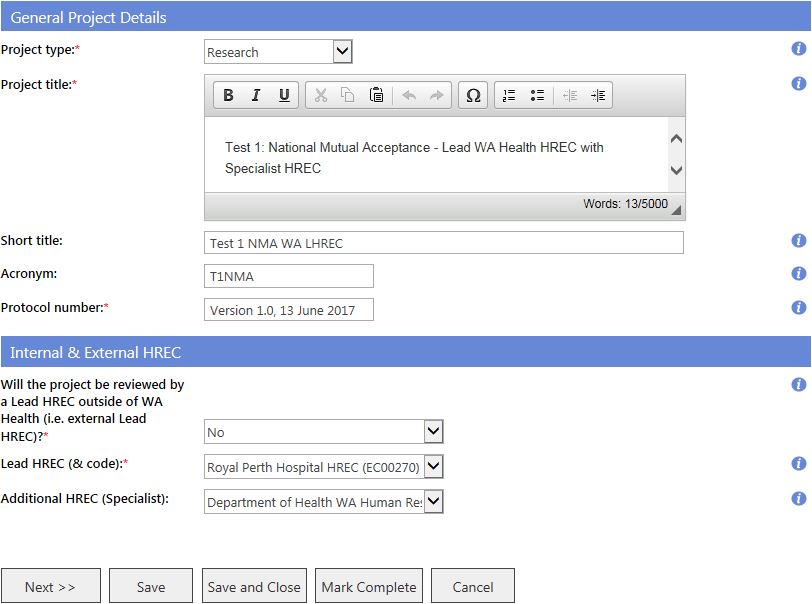
4. Click 'Save' to save changes, 'Save & Close' to save changes and exit 'Edit' mode, or 'Cancel' to discard any changes made.
5. When the project header is complete, click 'Mark Complete & Authorise'.
Once authorised the project header, that appears at the top of the project's workspace, will be updated to show the new information.
Complete Project Header for National Mutual Acceptance
WA Health is the Lead HREC (With a WA Health Specialist HREC)
1. For NMA, if a WA Heath HREC is the Lead HREC, select 'No' to the question 'Will the project be reviewed by a Lead HREC outside of WA Health (i.e. external Lead HREC)?'. Select the Lead HREC and add an Additional HREC (Specialist). Currently the Department of Health (Department) WA HREC is the only WA Health Specialist HREC and should be selected if access to the Department data collections or data linkage is required. Refer to
Help Wiki: WA Specific Information.
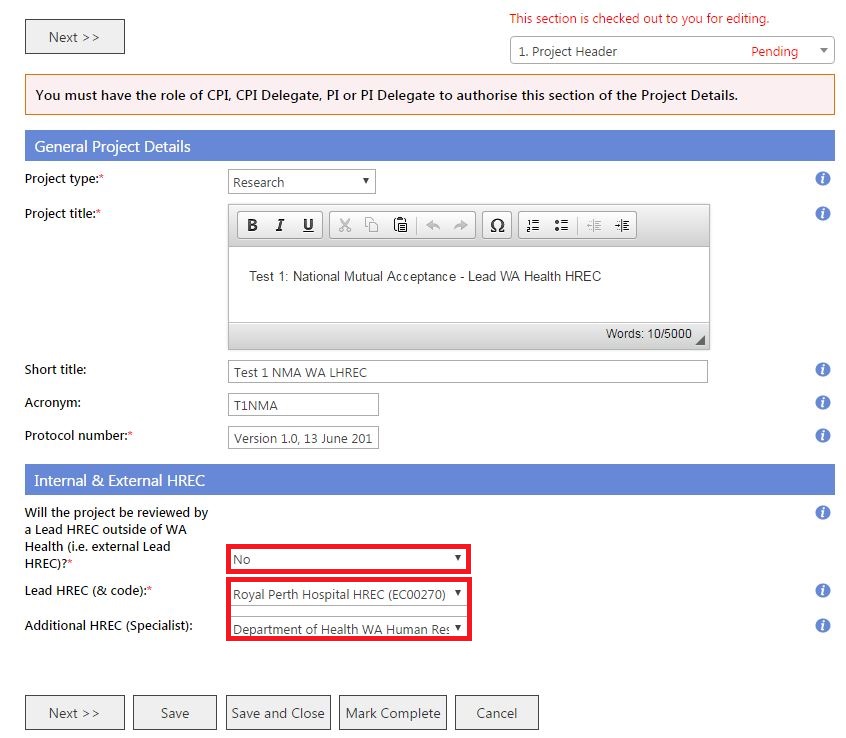
2. When complete, click 'Mark Complete' and 'Authorise' (refer to
Help Wiki: Complete the Project Header information).
WA Health is the Lead HREC (Without a WA Health Specialist HREC)
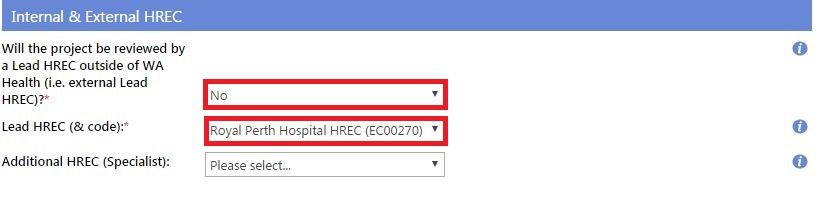
1. For NMA, if a WA Heath HREC is the Lead HREC, select 'No' to the question 'Will the project be reviewed by a Lead HREC outside of WA Health (i.e. external Lead HREC)?'. Select the Lead HREC. No Additional HREC (Specialist) is selected.
2. When complete, click 'Mark Complete' and 'Authorise' (refer to
Help Wiki: Complete the Project Header information).
External Lead HREC (With a WA Health Specialist HREC)
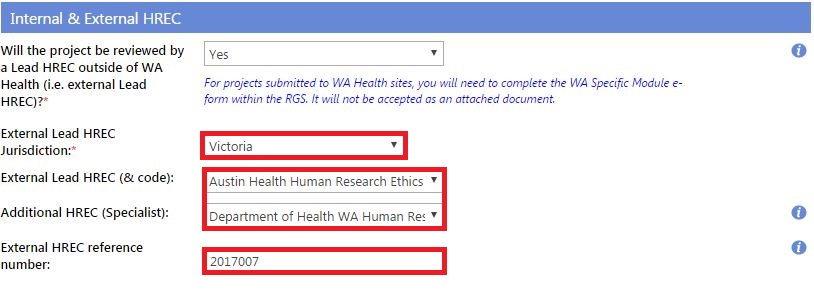
1. For NMA, if an External HREC (outside of WA Heath) is the Lead HREC, select 'Yes' to the question 'Will the project be reviewed by a Lead HREC outside of WA Health (i.e. external Lead HREC)?'. Select the Lead HREC jurisdiction and the External Lead HREC. The HREC must be participating in the NMA (Refer to
NMA HREC, RG Offices and Organisations). Enter the External HREC Reference number if known; this is important for national reporting.
Add an Additional HREC (Specialist). Currently the Department of Health (Department) WA HREC is the only WA Health Specialist HREC and should be selected if access to the Department data collections or data linkage is required. Refer to
Help Wiki: WA Specific Information.
2. When complete, click 'Mark Complete' and 'Authorise' (refer to
Help Wiki: Complete the Project Header information).
External Lead HREC Only
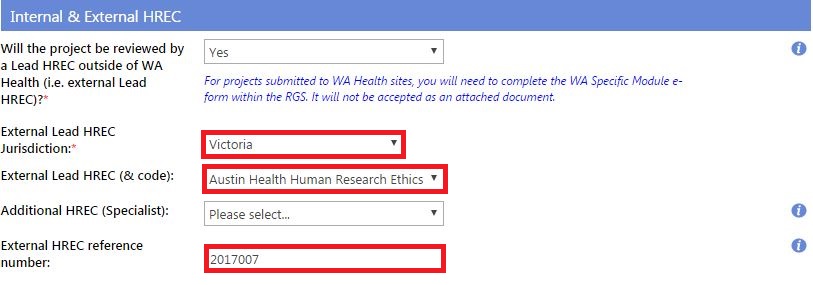
1. For NMA, if an External HREC (outside of WA Heath) is the Lead HREC, select 'Yes' to the question 'Will the project be reviewed by a Lead HREC outside of WA Health (i.e. external Lead HREC)?'. Select the Lead HREC jurisdiction and the External Lead HREC. The HREC must be participating in the NMA (Refer to
NMA HREC, RG Offices and Organisations). Enter the External HREC Reference number if known; this is important for national reporting. No Additional HREC (Specialist) is selected.
2. When complete, click 'Mark Complete' and 'Authorise' (refer to
Help Wiki: Complete the Project Header information).
Add the funder details in the Governance Information
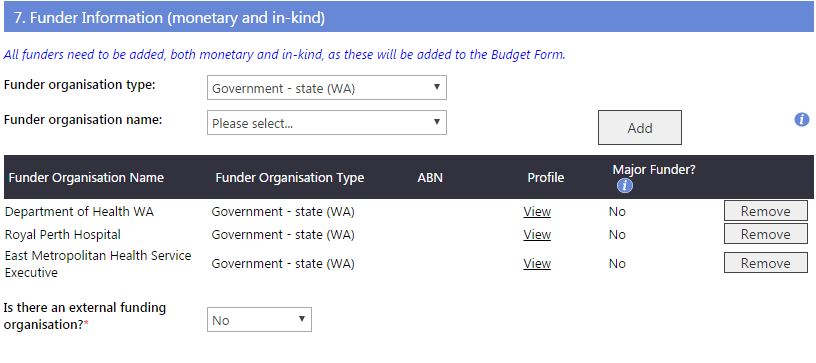
1. All funders (both monetary and in-kind) involved with the project must be added to
question 7 in the Governance Information section of the Project Details tab before the governance forms are commenced, as this information is populated into the Budget Form. If you cannot find a funder, contact the RGS Support.
2. For monetary funding: the funder organisation is where the funding or grant is coming from (e.g. the sponsor or NHMRC), not who the administrating organisation or contract research organisation is. There may be several funders providing monetary funding in a project. The administrating organisation or contract research organisation details can be added to question 7.1 for invoicing.
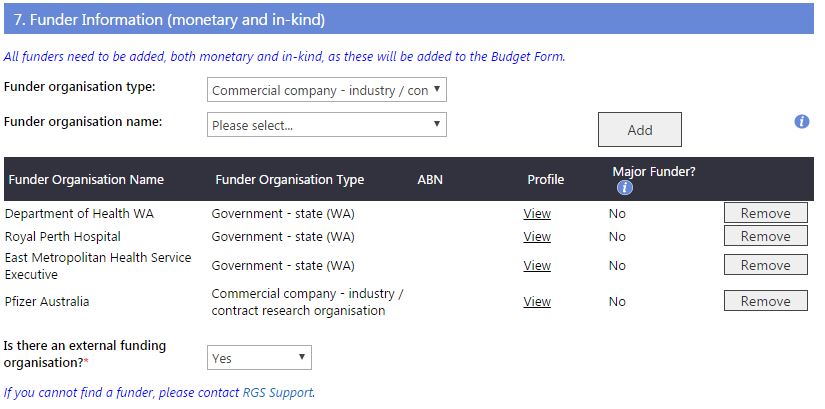
3. For in-kind funders: the funder organisation is the one that is providing the in-kind support, examples include:
- in-kind support of project member's salaries if they are not covered by monetary funding; their employing organisation must be nominated (e.g. Royal Perth Hospital)
- in-kind support by organisations hosting HRECs and RG Offices for the ethics and governance review fees that are not charged for non-commercial projects (e.g. East Metropolitan Health Service Executive).
Contact the
Ethics and RG Offices to find out how much should be recorded in the Budget Form either for monetary fees or in-kind support. If the latter, also ascertain which host organisation name should be added as a Funder.
Authorise or unauthorise a section of the Project Details tab
Authorise
Only the CPI, CPI Delegate, PI or PI Delegate (refer to 'Project Member Role to Authorise / Unauthorise Project Details') have the authority to authorise the Project Details sections once it has the 'Completed' status.
1. If you have the authority to authorise (or unauthorise) a project the 'Authorise' button will appear at the bottom of the screen. Click on 'Authorise' to mark the specific section of Project Details as 'Authorised'.
Ensure there are no pending membership invitations before you authorise the Investigator Contact Information. This means, there should not be any rows under 'Invited' in the Members tab.

2. Once relevant sections are authorised, Project Members can add new forms in the Applications tab.
 Unauthorise
Only the CPI, CPI Delegate, PI or PI Delegate (refer to 'Project Member Role to Authorise / Unauthorise Project Details') have the authority to unauthorise a Project Details section once it has an 'Authorised' status.
1. If you wish to make changes to the section but the status of the section is 'Authorised' the section must be unauthorised by clicking 'Unauthorise'.
Systematic unauthorisation of the Project Details tab
Note that changes to other tabs in the project workspace will trigger certain sections of the Project Details tab to be automatically unauthorised, and reverted back to 'Completed' status. This is to show Project Members that updates have been made to the relevant tab:
|
Project Details Section
|
Project Workspace Tab
|
|
Ethics Information
|
Unauthorised when there are changes to the project sites (Sites tab)
|
|
Investigator Contact Information
|
Unauthorised when there are changes to the project sites (Sites tab) and/or in the project membership (Members tab)
|
If the user changes anything in Project Details tab, any Active forms (i.e. unsubmitted) marked as complete must be unlocked, to ensure there are no additional questions that have to be answered or answers that should be amended.
Other references
Researchers User Guide (Part A)
Researchers User Guide (Part B)