Other references
User Guide Monitoring - Amendments
In this page...
When is an Amendment required?
An amendment is required when there has been a change to the project. All supporting documents should be submitted with the amendment. There are two types of amendment forms, the Amendment Form and the Governance Only Amendment Form. The Amendment Form can be submitted to both the HREC and Research Governance (RG) Office (if there are no site specific documents related to the changes). The Governance Only Amendment Form is used when the changes are site specific. This form can have an Amendment Form attached to it if the update is related to that Governance Amendment.
For further guidance see
WA Health Research Authorisation and Monitoring Forms Guidelines .
Add an Amendment Form
Any Project Member (PM) can add an Amendment Form to the project. Go to the Monitoring tab in the Project workspace.
Click 'Add' under the Forms section and select the Amendment Form and click 'Add Selected Form to the Project'. The form will open in Edit mode. Clicking 'Save & Close' will take you out of Edit mode.
Select Section
The form is in sections and you only need to complete the section relevant to the type of amendment you are submitting. The form has information icons
 which you can hover over with your mouse to see the information related to that section.
There are seven sections to the form:
- Project Details
- Change to Project Documentation
- Change to Project Investigators
- Addition of a Site
- Extension of Approval
- Department of Health Data Collections – Data and/or Linkage Update
- Declarations
While Section 1 Project Details always needs to be completed, Sections 2-6 only need to be completed if you have answered 'Yes' to the first question in that section. Remember to select 'No' to the sections that are not relevant.
Section 7, the declaration can be signed by either the Coordinating Principal Investigator (CPI), the CPI Delegate, Principal Investigator (PI) or PI Delegate.
Complete the Form
In Section 1 select the sites affected by the amendment e.g. all sites for a change to the protocol.
Select 'Yes' or 'No' to the first question in each of the next five sections. Selecting 'Yes' will open the section and the mandatory fields, that are denoted by a red asterix (*) next to the field title, which will have to be completed.
Adding a Document
A document can be added through the form or from the Document section of the Monitoring tab.
To add a document through the form, select 'Yes' in Section 2 Change to Project Documentation and the 'Add' button will appear. The form will also show any documents that have been added under the Monitoring tab that are not associated with a form.
Click the 'Add' button and the Add Project Documents screen will appear. Complete the information for the mandatory fields. Once all the information is added, click the 'Add' button.
You will have to select all the documents that you want to submit with the Amendment Form even if you have added them in the form.
See
User Guide Monitoring – Document for assistance with this.
Declaration
When all the mandatory fields have been completed click the 'Mark Complete' button, this will take you to Section 7 Declarations, where the form can be signed and authorised ready for submission. You can also navigate to this section of the report through the form 'Index'. The form and documents can now be submitted. See
Submit the Form.
Add a Governance Only Amendment Form
Any PM can add a Governance Only Amendment Form to the project. Go to the Monitoring tab in the Project workspace.
Click 'Add' under the Forms section and select the Governance Only Amendment Form and click 'Add Selected Form to the Project'. The form will open in Edit mode. Clicking 'Save & Close' will take you out of Edit mode.
PMs can only complete the form for sites that they are associated with and submit the form to the RG Office associated with those sites.
Select Section
The form is in sections and you only need to complete the section relevant to the type of amendment you are submitting. The form has information icons
which you can hover over with you mouse to see the information related to that section.
There are five sections to the form:
- Project Details
- Change to Project Documentation
- Change to Budget Form
- Attach an Amendment Form
- Declarations
In Section 2 Change to Project Documentation add site specific documentation (e.g. insurance certificate) that is not required to be submitted to the HREC for review. Add and select the documents within the form as described previously under Adding a Document.
Declaration
When all the mandatory fields have been completed click the 'Mark Complete' button, this will take you to Section 5 Declarations, where the form can be signed and authorised ready for submission. You can also navigate to this section of the report through the form 'Index'.
Amendments approved under National Mutual Acceptance (NMA)
If the amendment has been approved by a Lead HREC outside of WA Health, then a Governance Only Amendment (GOA) Form will have to be created and submitted to all Research Governance (RG) Offices that have authorised sites in the project. The GOA Form can only have one RG Office and its sites included in section 1 but it can be submitted to all the RG Offices. This GOA Form should include the HREC's approval for the amendment.
If there are site specific documents that need to be provided to an RG Office as a result of the HREC approved amendment, this should be a separate Governance Only Amendment Form. The GOA Form with the HREC amendment should be referenced in Reason for change so that it can be associated by the RG Office.
Submit the Form
To submit the form, scroll to the bottom of the Monitoring tab and click the 'Submit' button.
The Submit Project screen will appear and show all available forms and documents that can be submitted. Click the box under the HREC or RG Office that the form is to be submitted to, all documents associated with the form should be automatically ticked if they have been selected within the form. If they have been automatically selected then click the Submit button, you will get a message that the submission was successful, an automated email will be sent to you detailing what you have submitted.
If the documents have not been automatically ticked, then click Cancel and go back to the Monitoring tab and open the form. Go to the Declarations page, click Un-authorise at the bottom of the page and then click Edit. Navigate to the first page of the form and scroll down to the Supporting Documents section, ensure that all documents that relate to the form are ticked. Click the Mark Complete button and sign and submit the form as described above.
Governance Only Amendment and Amended Budget Forms
An amendment is required when there has been a changed to the project. The Governance Only Amendment (GOA) Form is used when the changes are site specific. This guide is specifically when a Governance Only Amendment Form
and Amended Budget Form (ABF) is required (an ABF can't be created for a migrated project). These forms will only be submitted to a Research Governance (RG) Office. This form can have an Amendment Form attached to it if the update is related to that GOA.
Add the Governance Only Amendment(GOA) Form
Any Project Member (PM) can add a GOA Form to the project. Go to the Monitoring tab in the Project workspace.
Click 'Add' under the Forms section and select the Governance Only Amendment Form and click 'Add Selected Form to the Project'. The form will open in Edit mode. Clicking 'Save & Close' will take you out of Edit mode, closing the form and taking you back to the Monitoring tab.
PMs can only complete the form for sites that they are associated with. The form has to be signed/authorised and submitted by the PI or PI Delegate for that site.
Select Section
The form is in sections and you only need to complete the section relevant to the type of amendment you are submitting. The form has information icons
which you can hover over with you mouse to see the information related to that section.
There are five sections to the form:
- Project Details
- Change to Project Documentation
- Change to Budget Form
- Attach an Amendment Form
- Declarations
In Section 2 Change to Project Documentation add site specific documentation (e.g. insurance certificate, research agreement, site specific Participant Information Sheet and Consent Forms) that is not required to be submitted to the HREC for review. Add and select the documents within the form.
A document can be added through the form or from the Document section of the Monitoring tab.
To add a document through the form, select 'Yes' in Section 2 Change to Project Documentation and the 'Add' button will appear. The form will also show any documents that have been added under the Monitoring tab that are not associated with a form.
Click the 'Add' button and the Add Project Documents screen will appear. Complete the information for the mandatory fields. Once all the information is added, click the 'Add' button.
You will have to select all the documents (by ticking the box to the right of the document) that you want to submit with the GOA even if you have added them within the form.
See
User Guide Monitoring – Document for assistance with this.
Add an Amended Budget Form (ABF)
If you select 'Yes' to Section 3 Change to Budget Form you will have to select the last authorised budget form that you want to make changes to. Once this is selected you will have to click 'Save & Close' to go back to the Monitoring tab to access the new ABF. It should be sitting under the GOA. You can only access the ABF from the Monitoring tab.
Declaration
When all the mandatory fields have been completed click the 'Mark Complete' button, this will take you to Section 5 Declarations, where the form can be signed and authorised ready for submission. Once the GOA has been marked complete you can also navigate to this section through the form 'Index'.
Amended Budget Form
To change the ABF, click on the name in the Monitoring tab. The ABF when opened will still retain all previous authorisations. You only need to make unlock the department/s where a change needs to be made the rest of the departments will retain their previous authorisation.
Click the Unauthorise button at the bottom of the page and then click 'Edit'; the form will be locked out to you until you click 'Save & Close'.
Go to Section 2 and click the 'Unlock' button to edit the department that requires changes, this will also revert the Head of Department's invitation and authorisation status to pending. Make the required changes in that section of the ABF. Click 'Save' to save the changes. Next go to Section 3 and update the funding and click 'Save'.
Then go to Section 1 to invite the person responsible for authorising that department. You can also at this point change the person you are inviting. To change the person, tick the box under the Select column at the far right. Click the Edit button under the Departments and in the pop up window delete the person and add the new person. Click Save to save the changes.
Click 'Invite to quote/authorise' button. The person will then receive and email and a task for your project. The PI/PI Delegate will receive an email once they have signed.
The ABF has to be authorised by the PI or PI Delegate before it is ready for submission.
The PI or PI Delegate can then go to the Amended Budget Form and click Edit and then click 'Authorise'.
Submit the Form
The GOA and ABF have to be submitted together. Before submitting these forms please check that both forms have been authorised. To do this click on the three dot under the RGO that you are submitting to circled below.
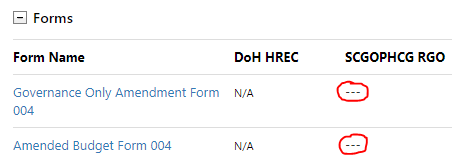
This will open a pop-up window and you will be able to see the status. Both forms must have the status of Signed and Authorised before they can be submitted together.

When they have both have the Status of Signed & Authorised click the Submit button in the Monitoring tab.
The Submit Project pop-up screen will appear and show all available forms and documents that can be submitted. If the ABF is not listed then it has not been authorised and you will have to go back to the Monitoring tab to do this. RGS will not allow you to submit a GOA without the ABF or the ABF without the GOA. If both forms are listed, click the box under the relevant RG Office for each of the forms. Any documents associated with the form will automatically be selected.
If the documents are not selected click 'Cancel' and then go back to the GOA and unauthorise it and edit it to select the associated documents, make sure to Mark Complete and Sign & Authorise.
Once all the boxes have been ticked, click the 'Submit' button at the bottom of the screen. You will receive a submission confirmation email.